Pages

Wednesday, January 28, 2015

Heavy Vehicles

Welcome

This card was made for a young boy, using a toy truck set  made here in New Zealand called by a company called FLONZ craft.


I stamped the images in espresso ink on scraps of  various coloured cardstock, and fussy cut them. 


The sentiment from Kiwistamping was embossed with a glitter gold ep., I then filled the letters with a gold pen.


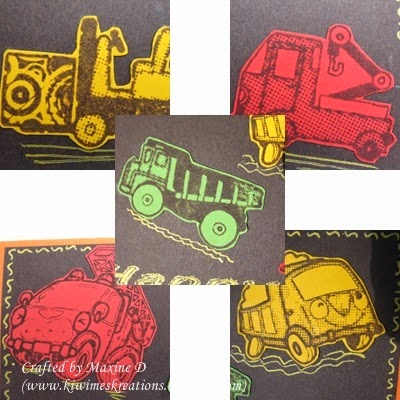
The images were randomly mounted around the dark brown card I had embossed the sentiment on, and grounded with gold lines, and the edges doodled in gold also.  This panel was then mounted over the orange base.

I am linking this to:

Thank you for visiting - any comments you may leave are deeply appreciated
May your day be blessed.

Monday, January 26, 2015

Dogs, Twine and Sparkle

 Welcome.

Loved how this card turned out, if I may say so myself. 


I  printed the digi image that I had downloaded from Graphics Fairy, and coloured it, when discovered that it was just too big to cut with a s/b die, so I ran a pencil around the outside of the largest oval die and hand cut it - then to cover some of the flaws, distressed and sponged it.


The next step was the embossed sentiment, also distressed and sponged


I wanted some texture in the background, and something to bring it to life, so  cut a piece of this gold fibre the size of the tan card I had cut for the background layer, adhered it, and then embossed it - it made a fabulous mat for the background.


The only other addition to the mat was the Bakers Twine, knotted and tied across the the end of the panel.


This was then mounted onto the green base.

I am linking this to:
Embossing the fibre fabric was something new I tried

Thank you for visiting - any comments you may leave are deeply appreciated.
May your day be blessed.

Thursday, January 22, 2015

Stylised Flowers with Chalk

Welcome

Summer is well and truly here and it inspired me to make this floral card.
(Unfortunately when I went to photograph this card, the sun was playing hide-and-seek, and I had a lot of difficulty getting a good shot)


The embossing folder was  Stylised Flower  by Provocraft, and I coloured the embossed images with chalks.  And what is summer if there are no butterflies??  I don't like the white ones and the damage they do in the garden, but these sparkling green ones are rather sweet.


The sentiment was gold embossed, and a sun charm, gifted to me by the very generous and talented MariLynn of Mississippi MacGyver was adhered using hot glue to fill the back of it, so it does not get crushed in the mail.


The white edge was cut using a Spellbinders Edge-abilites die.


The white panel was then layered over purple and red card stock.

I am linking this to:
Old - the embossoing folder, new, the charm

Thank you for visiting - any comments you may leave are deeply appreciated
May your day be blessed.


Monday, January 19, 2015

Gold Plated Model T

Welcome

I was going to blog this some days ago, but life got in the way... as it does!

The start of this card was the receipt of a 'new to me' stamp, which I promptly inked up and stamped multiple times on a scrap of white card.


I then stamped the Model T Delivery Van stamp with Delicata Gold ink, and made two impressions, then I cut the vans away from the wording.


I then cut one of the van images  in half, and placed the three images on the background. Note the wonderful sparkle the ink gives when the light catches it!!


I also cut the title out and added that to the background.


Next I stamped the greeting and embossed it in copper, trimmed it and rubbed the edges  over the ink pad I had used for the back ground.  


The panel was mounted on an orange layer, and I ran some dashed lines up the edges to echo road markings.
I decided to place the sentiment over the edge of the panel for greater effect.
The whole was then mounted on black.

I am linking this to:
The background stamp was 'new to me', and the van stamp was used for the first time

Thank you for visiting - any comments you may leave are deeply appreciated
May your day be blessed.

Thursday, January 15, 2015

All Dressed Up with Flowers

Welcome

It is summer here in the Antipodes, and today we reached 31oC (approx89 oF), and we are waiting for a thunderstorm - the clouds are here, and something must be brewing as the poor old cat is hiding under the bed!!


To help keep her cool, this sweetie from All Dressed Up, our sponsor for CCC Digi Challenge#17, is wearing a hat with a very wide brim, much like my grand children currently are - essential in this weather.


I coloured her with Prismcolor pencils, and enjoyed doing it - colouring seems so therapeutic at times.  I stood her on some grass, and chalked a (cloudless) sky above her, but it is very pale and does not show well in the photos.


Next I punched some flowers using a two small Stampin' Up punches, put some sticky tape behind them, and added gold and purple glitter. It got a bit mixed on some flowers, but I am happy with the results, as it was a 'new to me' technique.


The final addition was a piece of ribbon and a flat, folded bow.  I have no idea what brand the ribbon is as it was in a RAK gift from Grace of Th-ink-ing of You.


I had 'practised' the flowers, and tried out which punches and how to place the flowers on a scrap, so trimmed this down and popped it inside the card.


Thank you to All Dressed Up for this gorgeous image to work with.

I am linking this to:
(New to me technique)
(new to me technique)

Thank you for  visiting - any comments you may leave are deeply appreciated
May your day be blessed


Saturday, January 10, 2015

Scraps from my Desk

Welcome

The other day I made a card with literally the scraps on my desk (and in my 'one day' box, which is just a place to put the scraps and make my desk look vaguely tidy.)


I started with the stamped/chalked background - I had made a few of these last year, and this was the final one. I had hesitated to use it as I wanted to do something 'different' this time, as I had made two similar cards. Here is an original.


I then found this scrap of blue, the negative of a die cut, which fitted neatly over the piece of chalked paper.


The sentiment was embossed with a silver glitter powder, despite the fact it looks lumpy in the photograph, it does sparkle beautifully.  I sponged some interference ink around the sentiment after cutting the die shape.  I attached it using some purple gem brads.


Here you can see how the blue paper reflects the light and brings the card to life.  The finishing details were some paper flowers, secured with a matching brad, attached over some leaf ribbon.  The purple ribbon is a self adhesive satin ribbon, with the glitter ric rac glued over it. 


I even added some of the glitter ric rac to the inside.

I am linking this to:
Leaf Ribbon from RRR

Thank you for visiting - any comments you may leave are deeply appreciated.
May your day be blessed

Thursday, January 8, 2015

Destination Unknown

Welcome

I made this as a masculine card - and because of that kept it pretty simple


Love this sentiment - there were many holidays when I was young when we had to stop and ask directions - it became a standing joke that it wasn't a 'proper' holiday until we had been lost!


Both the sentiment and the image were stamped with Versamark ink and embossed with silver ep.  The stamps are part of a set by Kiwistamping


The only embellishments were some strips of Washi tape - the zig zag tape has is silver, and has quite a sheen to it, and a line drawn around the border with a silver pen.


So glad motor vehicles have progressed past this stage!

I am linking this to:

Thank you for visiting - any comments you may leave are deeply appreciated
May your day be blessed

Sunday, January 4, 2015

Glimmer Bookmark

Welcome

I am currently doing an online class using all sorts of glimmer mists and glazes etc, and when I had some Perfect Pearls in Kiwi left on my work surface, I could not bear to waste it, so wiped this tag through it.  I then sprayed it with Perfect Pearls Mist, Perfect Red.


It then sat on my desk for some days, until I decided I wanted to make a tag style bookmark to go in a card I was making this afternoon.


I printed out the verse from Word Art Wednesday for this weeks challenge, die cut it with a S/B die Labels Three.  I sponged it with Tea Die D.I. and the Delicata Gold ink before removing the die. 


After adhering the scripture panel, I then added some green, leaf shaped, ribbon that I got as a sample from Really Reasonable Ribbon in an order I received from them. 
The final details were some tiny flowers I punched from pink sparkling card.  
I did not want any gems or pearls on this as they could damage a book.  
To form a 'tail' on the bookmark I added some hand died hem binding.

I am linking this to:
The ribbon and perfect pearls
The ribbon, and perfect pearls
The ribbon from RRR

Friday, January 2, 2015

First Stitches, by Button

 Welcome

Late last year my four and a half year old grand daughter, Button, (her mother's blog name for her), came home from Kindergarten (preschool)  with this picture she had drawn and stitched by herself.  Both her parents and grandparents were very impressed!!  The Hessian was rather roughly cut, so I offered to mount it on canvas for them.


I found a canvas, and painted it with Vintage Photo distress stain, as that was really the only brown I had to use - this caused difficulties later,


I straightened the edges and hemstitched around it, using a floss of similar colour, so as not to detract from the image.


When I went to adhere the Hessian using Gel Medium, the stain started leaking into the medium, so I had to work really quickly to minimise the 'bleed'.  I think I was reasonably successful.  I then added a scattering of assorted sequins to bring the piece to life, and try and take the eye away from the colour bleed..


This is the finished project.


And this is Button receiving the piece - she was very excited, but found the glare of sun difficult, so the smile was not quite there!


Thanks for visiting and sharing this piece of family fun.

May your day be blessed


Thursday, January 1, 2015

Brittany and Embellishments

Welcome
May 2015 bring you many joys!!

This month's Challenge at CCC Digi Challenges is to use Digi and Embellishments, 
and our sponsor is 


I used the beautiful Brittany 1920's Flapper image, and coloured her with Prismacolor pencils.


I used perfect pearls on her necklace and the flower in her hair. 
Rhinestones, over ribbon, both straight and bowed, and placed on the patterned paper were the predominant embellishments.


A purple feather overlaid on the image feather. The Kindy Glitz shows here on her hair flower, but not so much on her frock.


The birthday sentiment was embossed in silver on the purple patterned paper, from a 'Rosie's' pad.


I mounted her over two layers of punched iridescent plastic waste, which made some unexpected (flower shaped) secondary patterns.
The final detail was the gorgeous Prima flower, which I mounted over a 'V' of ribbon.


Thank you for visiting - any comments you may leave are deeply appreciated
May your day be blessed.