Pages

Tuesday, December 31, 2013

2013 In Review

Welcome.

Here in my corner of the Antipodes there are barely six hours of 2013 left, so I thought I would do a review post.  
A link to the original post is in the title of each card.

I have enjoyed the year of crafting, and have a new project in mind - an art journal.... a totally new venture for me.


February - Flowers and Bling


September - Victoriana in Green


October - Pretty In Pink


November - Christmas Blues


I have enjoyed looking over the cards I have blogged this past year, and some months the choice was rather hard, as I liked several of them!

I hope you have enjoyed my review.
May you be blessed with Peace and joy in 2014

Friday, December 27, 2013

Purple Negative Diecut

Welcome.

It is good to be back here and blogging - life has been a bit hectic these last few days - but enjoyable with Grandchildren to chase and cuddle, and their parents to share the time and tasks of Christmas with!

This card is needed for a January birthday, and I really sat down with no set plan in mind.  I started with the blue base card, and then noticed the negative die cut on my desk - and this is the result.


I decided to use a sheet of purple reflective 'stuff' I have had in my stash from 'way back'... It has an adhesive backing, which was easy enough to get onto the base, but it gave me some problems in getting the die cut to attach to it.


I then looked at it and decided to use some sequins to add some interest, and because I had been given some from a friend recently.  There were all sorts in the wee container, and I had fun mixing and matching them over the background, and trying to make them look truly random in the placement!


As there were some gold sequins, I decided to emboss the greeting with gold, and added three sequin under it for a wee bit of emphasis.

I loved working on this card and was very pleased with the outcome - and thanks to Linda of Lovely Linda's Craft Central for the inspiration to use the negative of a die cut.

I am linking this to:
(Old, the Purple 'paper', New, the sparkles)

Thank you for visiting - any comments you may leave are deeply appreciated
May your day be blessed

Thursday, December 19, 2013

Another Orange Poppy

Welcome.

I had some studio time yesterday and some orders to fill, and this is one of the outcomes.


I was inspired by a large cling "Bandanas" stamp by Stampendous that the lovely Kelly at Sandcastle Stamper sent me as a RAK.  


I simply stamped and clear embossed it on the background blue. I was reminded of this technique by a challenge on the Splitcoast Stampers site.


The poppy stamp is part of a stamp in the Sweet n Sassy set Precious Poppies. I stamped it in black and used gelatos to colour them. After fussy cutting the image I mounted it on foam dots to give a wee bit of dimension.


The sentiment panel was also embossed, this time with blue ink.  I hand cut the end to form a banner, and the centre of the tag was slightly lifted by using three foam dots under it.
The finishing detail was the addition of the pearls.

I am linking this to:

Thank you for visiting - any comments you may leave are greatly appreciated.
May your day be blessed.

Tuesday, December 17, 2013

Christmas - the main card

Welcome

I usually mass produce my Christmas cards because of time constraints as much as anything, and this is what I have posted out this year.


Most folk who read this blog will have received their cards, so that is why I feel free to share it now.


The main image is from a retired Layers of Color set called 
Christmas Blessings. I chose to stamp it in Adirondack Espresso ink as it was not as harsh as the black ink looked in my 'prototype'.  I added a wee bit of chalk for some subtle colour.


The background was sponged using Barn Door and Mustard Seed Distress Inks, through the stencil Vintage Medallion by Layers of Color (again, retired).

The card was made by using the technique described here.

I am linking this to:

Thank you for visiting - any comments you may leave are deeply appreciated.
May your day be blessed.

Friday, December 13, 2013

Christmas Class

Welcome

The other day I ran my final class for this year, and we focussed on calendars for next year, that could be used as wee gifts.


The card was cut to 6cm x 6cm and the ric rac was adhered to the back of the panels before the papers were adhered.  There were two covered with patterned paper, and one with distressed paper.


I took the year digits, cut them down and sponged them before placing them on the top panel.


The calendar was a 'freebie' I found online, and I cut it into squares and ran some tacky glue across the top while holding it together with bulldog clips. This means that the pages can be peeled off each month. 


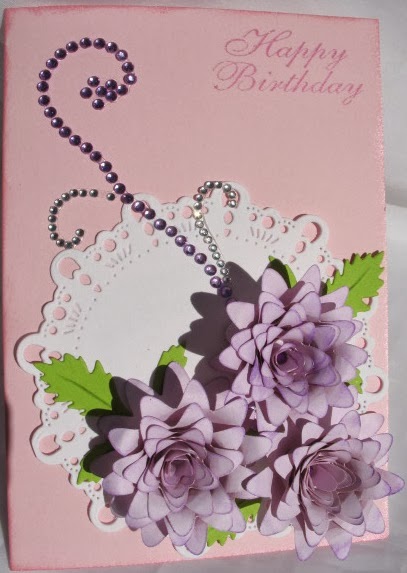
The flower has three die cut layers of patterned paper that were sponged and adhered with glue dots, and finished with a pearl.  The leaves were die cut and popped behind the flower.
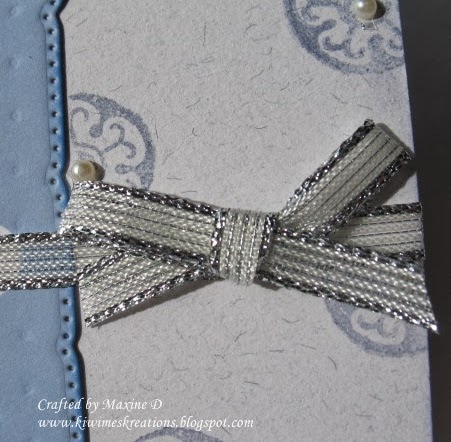
To complete the project I added Kindy Glitz and butterflies with liquid pearls.


The next project was one inspired by this video by Cathy Andronicou, and is a 'no cut' bag.  It is just the right size to pop the calendar into.


I made this out of a soft paper, and regretted it as it was difficult to work with.


 The paper was also very soft and porous, so I used stickers not stamps for the decorations. 

To finish up the afternoon, we made a wee pocket calendar.


The calendar was the same one I had printed earlier, mounted onto a piece of card 5.5 cm x 10.5cm.  The calendar was adhered to the card 2cm from the top. The card was then folded around it, a tag was shaped on the short end, and slot cut in the bottom of the card to fit, and volia, the project was complete.


I later added an eyelet and thread loop, so I can pin it to the inside of my handbag.

If I made this again I would probably emboss the card before making the cover.

Thank you for persevering through this long post. Any comments you may leave are deeply appreciated.
May your day be blessed

Wednesday, December 11, 2013

Kind Thoughts

Welcome

I wanted a card to cheer up a friend who has had a bit of a rough time recently, and this is the card I made.


Love the bright cheerful paper. It is an Amy Tangerine pad called Ready, Set Go. I left it to sing the song on this card.


I simply accented the card with bright red ribbons and a red flower.


The sentiment was double mounted on white and then red, and using punches to decorate the corners.


The sentiment itself was embossed with gold.


The inside was finished with a liner that had the corners punched to match the outside, and the bottom corners of the card were also rounded with a punch.

I am linking this to:

Thank you for visiting - any comments you may leave are deeply appreciated.
May your day be blessed.


Sunday, December 8, 2013

The Big Reveal is Here!!!

Welcome

The big reveal is finally here - technical difficulties prevented it being bought to fruition last Sunday.


This is the reveal of the small photo that I shared last week.


To see the whole project please click on this link to go to


Yes - this is my project as a guest Spellblogger!! My name was drawn from those who 'liked' Spellbinders on facebook.  I must admit that I had at least one sleepless night thinking about what I wanted to do and how I would do it!

Thanks for visiting - any comment you may leave is deeply appreciated.

May your day be blessed.

Saturday, December 7, 2013

Leaves, Bows and Roses

Welcome

Having made several cards that have gone together very quickly and according to plan recently, I was a bit miffed this afternoon when I went to make a card, lost my mojo, was inspired by a card on the back of a stamp packet (made by Nina Brackett of Crafting In Croatia), and then struggled to make it!!


I started with the paper from an Amy Tangerine pack called Ready Set Go., found the blue card that matched, the lace I wanted to use, and then tried to make the sentiment panel....


Over an hour and at least seven attempts later I eventually settled for this - I stamped, silver embossed, and then trimmed and punched the corners of the blue panel, and mounted it on white and rounded those corners too.


The organza ribbon had frayed along one edge so it needed to be tidied up before I made the bow - thankfully the bow behaved itself and worked properly on my first attempt!!  The wee white roses are some I bought some time ago and I have no idea of the brand - I twisted the stems together and formed a hook which I tucked under the bow.


I had die cut the edge of the paper and initially was going to layer that over the lace, but ended up tucking it under the top of the lace, where it gives a wee touch of colour.

I actually like the card now, but this afternoon  it was a different story!!

Annabelle Stamps Challenge #174 - Colour Challenge (The colours are all in the dp)


Thank you for visiting - any comments you leave are deeply appreciated
May your day be blessed.

Friday, December 6, 2013

A Quick Card

Welcome
As we all know, everyday life has a habit of interfering with our card making aspirations, and that has been happening for me recently. The result is that I was needing a masculine card to be posted today, and this is the result.


I picked up a piece of the grey flecked card I used the other day and sponged the edges with Cobblestone ink.


I saw some scraps in my off-cuts container and cut them into banner shapes and sponged the edges with Tea Dye and Cobblestone inks.


I cut the Whimsical Tree D-lite die from dark green card. 

I fidgeted the elements around on the card for a few minutes, and decided that the sentiment could be stamped on the plain coloured banner, so stamped and embossed that, then assembled the card. The final detail was to ground the tree with a quick swipe of Tea Dye and Bundled Sage distress inks.


One card finished in short order and one happy camper here!

I am linking this to:

Thank you for visiting - any comments you may leave are deeply appreciated
May your day be blessed

Tuesday, December 3, 2013

Simple Sympathy

Welcome

I needed a sympathy card for a gent who has recently been bereaved, and this is the outcome.

I always find myself in a quandary as to what to make - do I make a 'frilly' card for a man who has lost his wife, or a simple one.  This time I went for the simple option.


I started with a grey flecked card base, sponging the edges with Cobblestone ink.  The blue panel was in my stash of 'bits' that I had experimented with.
This was cut using the largest die from the Spellbinders Marvelous Squares 
set, and then de-bossed using the Swiss Dots embossing folder. The edges were lightly sponged with a blue ink.


The same card as the base was used for the sentiment panel - I silver embossed the sentiment from an Our Daily Bread Designs set of stamps. This was cut and embossed, and before the die was removed, I ran a silver pen around it.  I then layered that onto a silver scalloped oval.  The layered pair were mounted on the blue panel, which I had run a silver ribbon through.


I added a bow, took a second look and decided it was rather spartan, so found this wee stamp in an old set, masked the blue layer and randomly stamped it  onto the base in the cobblestone ink. 


 The final details were the pearls, which were popped onto the the abstract design and also under the sentiment. 


Thank you for visiting, any comments you may leave are deeply appreciated.
May your day be blessed