Pages

Sunday, October 31, 2010

Flower Power

Hello and thank you for calling by to visit again.


I needed a card for and eight year old girl, and decided to use this lovely image that Cora from Digital Two for Tuesday put on her site some time ago.


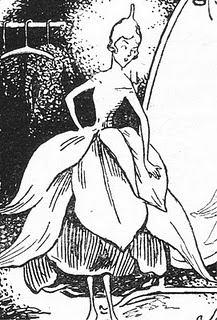
I coloured this with chalks, using the blender pen in some areas, and added some 'jewels' - what self respecting girl dressing to go out would be without them! 

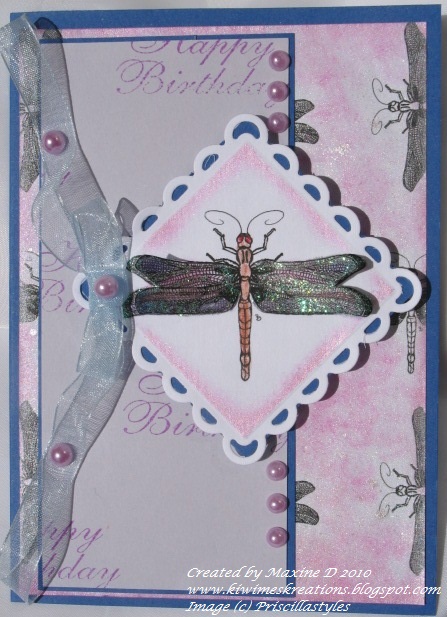
The image was then layered onto coloured cardstock, and mounted onto the base.  Then came the question of an additional embellishment and trying to find the right coloured ribbon was almost impossible, so I went with this irrediscent ribbon and made a double bow.  The sheen and glimmer on this echoed the jewels perfectly, and to finish it I added a jewel to the centre of the bow.

The green base is quite a harsh colour, so to soften it I sponged a mid-green around the edge, which really gave the whole a very 'finished' look that I was pleased with.


I am linking this to the following challenges:

Thanks so much for calling by, and do feel free to comment - I love seeing that you have visited and and reading your notes.

May your day be blessed.

Tuesday, October 26, 2010

MSSC#77 - Floral Birthday

Greetings again - it is so great that you call by and visit me here.


The card I am featuring today I made for the Midnight Madness Sketch Challenge #77, featuring this sketch .


I started out with some background paper from Christina Re that I had been given some time ago, and decided on my colour scheme from that.  I loved the paper so much that I kept the central feature fairly contained to show off the design.


Although it is not easily apparent, the stamens in the paper (which has a lovely rich sheen to it IRL) are pale blue, and the blue card I used is an almost identical colour.  The central panel is stamped with the head of a flower from the Ornate Flowers clear stamp set by Paper Studio.  I inked it using the 'rock and roll' technique using the Memento inks Desert Sand and Rich Cocoa, and distressed and sponged the edges of that panel with the paler ink. 


I chose the double sided ribbon as the brown fitted so well, and the pink added just enough contrast to balance things out  with the pink flowers, which were a packet I had had on hand for ages.... I really am starting to use some of my stash!!  There were enough flowers in varying sizes to add some real interest, and for the main feature I layered three. Each flower then had a wee pink dimensional flower added which is quite shiney and really lifts the whole card.
The final feature was the wee tag and sentiment tucked in under the big flower.  The edges of that were also distressed and sponged.

I am linking this to the following challenges:


Thank you for calling by, I do treasure your visits and comments.

May your day be blessed.


Monday, October 25, 2010

Flowers and a Butterfly

Good day to you all - it is lovely to have you visit again.


I managed some time in the studio yesterday - as a break from gardening, now the spring has finally arrived - and I reverted to conventional stamps again - in particular my Layers of Color stamps, which I have sorely neglected recently.


This first one was an experiment with a non-conventional shape - I used my largest scalloped oval Nestie for the base, and then layered onto that two plain ovals, in the two largest sizes I have.  The smaller of the two I sponged before removing the die, and then stamped it using an Acanthus leaf which was painted with twinkling H2O paints.  
The flowers were from the Nature Walk set and stamped onto another piece of card stock, painted, cut out and then layered onto the oval and a chocolate brown pearl was added to the centre.

I assembled the whole, adding a small bow as a feature. I then creased the top of a large (matching) scalloped oval and glued the two together using the top section above the crease. I discovered that when you cut and layer two scalloped ovals, you cannot flip one over and have them line up!!  


The second card I went with a conventional shape, but used some background card that I made some time ago using the 'spray and smash' technique.  I mounted the two pieces on different coloured card stock.  


The butterfly, from the Joyful Noise set,  was stamped on another
piece of card, gold embossed and painted with twinkling H2O's - I love those paints!! I chose  colours that contrasted with the background to make it a real feature of the card.


I assembled the card, adding ribbon on three corners of the layers, including a tiny bow in one corner.


There were frosted green pearls added to two corners, and the sentiment was gold embossed, but was quite discreet so that it does not take the eye away from the butterfly.  Finally I added a rhinestone 'trail' to the butterfly.
Two totally different cards but I was pleased with them both.


Thank for calling by, and I treasure the comments you leave.


May your day be blessed.

Friday, October 22, 2010

Another Dragonfly

Greetings again from a lovely sunny spring day.


I liked the MMSC #76 so much that I tried again.... and again I used the dragonfly from Priscillastyles... The base paper is one I made myself using the dragonfly image repeatedly - what I had in mind and what I ended up with when I finished with the computer  (or should I say that the computer finished with me?) were two different things, but I got the creativity going and chalked the background and then sprayed it with silver Glimmermist. I am very happy with that result!
The main image was cut around with a Nestie called Lacey Squares,  it was sponged with the Pearlescence Orchid ink before the die was removed.  I then backed this with some blue card that matched the base. 
                                                                                                    
The dragonfly was coloured with chalks and then  kindyglitz was added to the wings for some sparkle and shimmer.
I had cut a second set of wings which received the same treatment, before being adhered with dimensional glue. For some reason the wings curled as they dried, which gave extra dimension.

This panel was mounted over a pale mauve one which had Happy Birthday randomly stamped over it.  


The ribbon and pearls were added and I had a card completed which  I am very pleased with.


I am linking this to


Thank you for calling by and for your comments - they make my day. 

Wednesday, October 20, 2010

What happened??

Greetings to all my visitors - I always appreciate it when I see you have called.


When I started this card for the Midnight Madness Challenge #76 I had in mind a very feminine card, following this option.....


but ended up with a very clean cut masculine card instead.  I don't really know what happened - it seemed to develop a mind of it's own.

I was using the dragonfly image from PriscillaStyles Store and printed it twice, cutting out just the wings from the second image.  The image was coloured with chalks and then I layered Dimensional Glue over all of the image(s) to give some sheen and depth to them, and mounted the second set of wings over the uncut image, which had been cut out using a Nestabilies Labels 14 die.
The edges were sponged with an aqua ink, and then mounted on another die cut of navy blue card which had been trimmed really close to the edge.

This was mounted onto a panel that had been layered with a punched metallic sheet  (the 'waste' from sequin manufacture).  I then used my faux nail-heads to add the detail on each corner of that panel and the edges of the card.

The dp on the base of the card is a pale blue with some stripes on it (unfortunately the strong light I photographed in 'washed out' this detail) - they are feathered stripes and give an illusion/suggestion of water - most appropriate as we often see dragonflies over water here.

I am linking this card to:

Thank you for calling, and commenting - your comments are treasured

May you day be blessed

Saturday, October 16, 2010

Anniversary with bling

Thank you for calling in - I am away from home again, so I am going to share a card I made in September.


I love the quote that I used here, and when I came across it again recently I decided to use it for this card.  I typed it up on the computer, and used two fonts to give it some drama, and then sized it to fit on a Nestabilities Labels 14 (size 4) cut out.  After cutting the quote out, I sponged it while still in the die, using Memento inks, Danube and sky blues, cantaloupe and dandelion yellows. I stamped the sentiment in tuxedo black and cut it using the smallest die in the set, also sponging it before the die was removed.


The card base was white, and the blue is a piece of laser cut dp that I had on hand {a RAK from my neighbour :-)} and has a lovely sheen to it.


After layering the cutouts, I added the flowers with a pearl in the centers, and the flourishes in the bling and the card was complete.


I just wish that all my cards came together as quickly and easily as this one!!


I am linking this to: 


Thanks for calling by and I treasure your comments.


I trust you have a blessed day.

Monday, October 11, 2010

Layers of Color - new stamps just released

I must admit I am enjoying my work with digi stamps, but there is something about using rubber, and Laura at Layers of Color is releasing a new range of red rubber (cling backed) stamps that I just love!!!


You can visit her blog at the above link to see the 12 new stamps - and to add to the 'drool' factor there are three that co-ordinate with the new labels 14 spellbinders die, and five co-ordinate with the labels 16 spellbinders die.  Here is just a small sample of what is available........


Bird Queen (3in x 2 3/4in) red rubber cling art stamp    Cottage Rose (4 1/2in x 5in) red rubber cling art stamp        Poinsettia Frame (3 1/4in x 3 1/4in) red rubber cling art stamp. Coordinates with Spellbinder's Labels Sixteen
I can sense that I may soon be spending my hard saved dollars at Layers of Color - AGAIN!


There are also chances to WIN some stamps from this set :-)


I do hope you pop over to LOC and see what else is available.


May your day be blessed.

Thursday, October 7, 2010

MMSC#74

Hello - I am a wee bit late in blogging this card this week - combine a slight family emergency, internet issues and a gorgeous grand daughter and there have been a few distractions to say the least!!


The image I was given to work with is an adorable wee pup - it is taken from a photo of a pup named Charlie - I have not met him, but he looks a sweetie - and that from a person who is not a dog lover!!  On this card he is dressed for Christmas, but he is also available from Priscilla Styles Store in just the jacket.


I coloured his jacket in the traditional red and green of Christmas, with gold accents. The border of his jacket and the pom pom on his hat had some sparkle added by using some clear Kindy Glitz.  His body was coloured with chalks.


The image was cut out using a Nestabilities lacey circle and then the red and gold metallic cords were woven through the holes. Again these were left over from my embroidery days (I still do some stitching, just not as much or as demanding...)


When I planned this card I had wanted to use some coloured, cuttlebugged panels where the gold panels are, but I don't own the embossing folder I wanted to use, and  could not borrow it, so I compromised by using the slightly textured gold paper instead.


I also had to be inventive when it came to the ribbons, as the sketch suggested buckles, and as I do not own any I used the metallic cords and made bows.  There is a story there too, as again I had to improvise as I do not own a bow-easy, so a kitchen cooking fork was used to get the same sized bows.  (Poor DH sometimes wonders of anything is 'sacred' when it comes to my card making!!)


And here is the finished result with some bling added.


This is being linked to the following challenges:
Midnight Madness Challenge #74
Fab and Funky Challenge #43 - use a digi image
The Creative Cottage Challenge #24 - bling it up
Anything Goes Challenge Blog - Christmas has come early
A Spoonful of Sugar - Challenge #124 Sparkle and Shine
Oldie but a Goodie - All Creatures Great and Small
Karber Weekly Challenge#8 - use a digital image
Digital Tuesday Challenge #79 - Use Ribbon, buttons or bling with a digi image

Thanks for calling by, and your comments are treasured


May your day be blessed.

Wednesday, October 6, 2010

Woodgrain paper

Greetings - I am hoping I can get a brief blog post up as I am currently having internet problems.


I made this card for a masculine birthday, and I must admit I was lacking inspiration as I started, but I was pleased with the result in the end.


I wanted to use some woodgrain paper that I won from Sue McMahone of McMahon Five designs.  I used the Douglas Fur paper and cut it using a Nestability die - it cuts beautifully, I might add!


The pear (I cannot recall the maker of the stamp, and I am away from home at the moment)  was stamped using several inks applied to the stamp, and then I felt the need to add a wee bit more colour, so used the ink of the pads and a very fine paint brush and I was very happy with the outcome as it added some depth to the image.


This was then cut out, and mounted over the ovals - a strip of the woodgrain paper was cut and adhered to one side of the card and the ovals mounted over that.  Some more faux nail heads were added to the narrow strip, the sentiment stamped and embossed and the edges sponged.


Right back to my CAS roots, and very simple to make but a satisfying outcome.


This is being linked to 
Party Time Tuesday - Birthday - anything goes
CCEE Stampers - challenge 1041 - to incorporate wood


Thanks for calling by and may your day be blessed.

Saturday, October 2, 2010

A Very Quick Card!!

Greetings to all my patient followers - I will admit to being MIA for no other reason than I got the "Blahs" and did not want to blog - I have made some cards, but they are in the archives and may be pulled out at a later date...


I have recently started to make what I call 'male bling' - I wanted to add an accent, but did not want to use pearls or rhinestones, so I do 'faux nail heads'. 


Now to be honest, I have never actually seen or bought nail heads, but I have seen them on the internet, and if I remember correctly they are available at Gina K's Store.  I make them by punching out the colour card stock that I want to use with a 3/16" punch, adhering the dots to the card and then adding some dimensional glue - volia, a perfect accent!!


The card I am wanting to show you was made in 20 minutes - I think the drying of the glue on the accents was the most time consuming part of it!


I needed a masculine card for a mechanic/car enthusiast so I researched my digital images and came across this one from Cora at Digital Two for Tuesday, printed it out and trimmed it a wee bit, mounted it on black, stamped and embossed the greeting on white and mounted than onto black.


I then scored the white background, adhered that to the black base card, mounted the image and sentiment on the scored white panel, and then added the faux nail heads and it was all done!!  To good effect, I feel.


I am entering this in the following challenges:


No Time To Stamp - threes
Sew many Challenges - Digi image and anything goes
Stamp Something - Something to Celebrate
Totally Papercrafts Challenge #36 - The Great Outdoors

Thanks for calling by - I hope it has been worth the wait!!


May your day be blessed.